Incorporating Machine Learning Into App Design
The machine vision market is growing rapidly, and many of the world's biggest tech companies are investing in new machine learning tools. These tools enable developers to integrate machine learning and machine vision into their mobile applications.
According to Grand View Research, the machine vision market is expected to grow to $18.24 billion by 2025 at a CAGR of 7.7%. Let's see what industries make the most out of machine vision.
Industries that use machine vision in mobile apps
Machine vision is often used in manufacturing for quality and safety control. Software analyzes camera views in real time and notices if something isn't right.
There are many other industries that use machine vision, and in this article we'll explore how different kinds of mobile apps can use machine vision and how to implement machine learning in android app.
Warehouses and logistics
Machine vision is used for barcode scanning at warehouses. Barcode scanners can be implemented into wearables or mobile applications for mobility at a warehouse.

Usually, barcode scanners are implemented into wrist wearables for workers, as they don't take up space and are hands-free.
Retail
Retail is a large industry that can benefit from machine vision. How?
First, machine vision is great for online stores: a user can upload a picture of something they want to a mobile app and machine vision can recognise the item or search for a similar one.
The ASOS mobile app does just that.
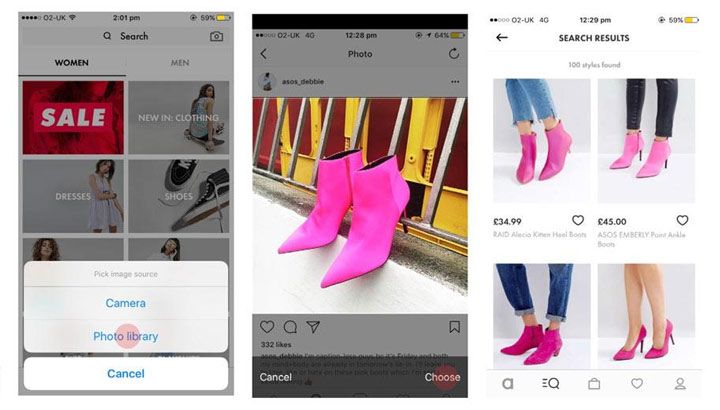
Its visual search feature is based on machine vision.
You can use machine vision in your ecommerce app for an offline retail store as well. A barcode scanner can allow customers to find more information about products as they're shopping in your store. There are many other ways to use machine vision creatively.
Agriculture
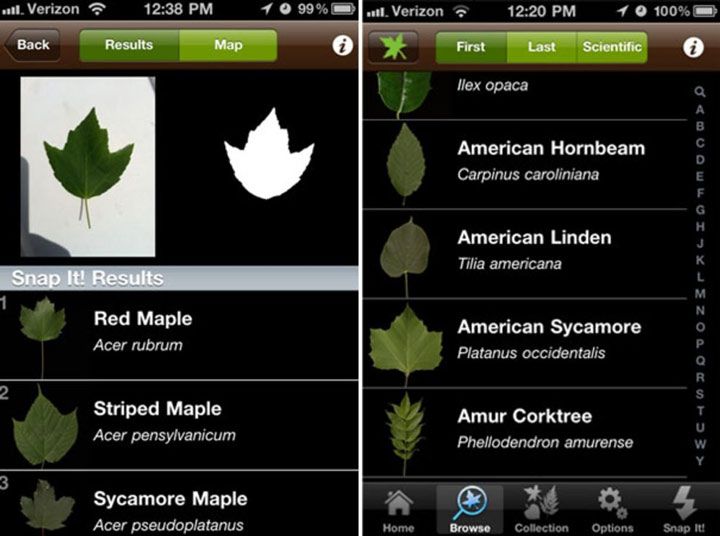
Agriculture also has quite a few interesting ways to use machine learning and machine vision. For example, a mobile app with machine vision capabilities can help to identify plants by just taking photos of them. For example, LeafSnap helps you identify trees.
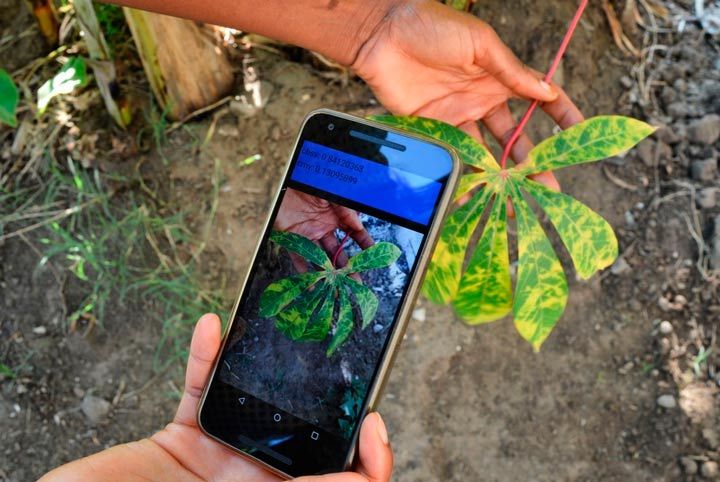
On the more professional side, an app from CROPTIX uses machine vision to help farmers diagnose crop diseases.
These are just a few examples of how you can use machine vision in a mobile app to achieve different goals. Machine vision is also used for translation, entertainment, and augmented reality. It helps to create smart AR app ideas and put them into practice. Let's find out in more detail what machine vision is capable of and what tools allow developers to integrate it into mobile apps.
Machine vision overview
Machine vision allows devices to find, track, classify, and identify objects in images. Complex machine vision algorithms allow you to get data from images and analyze it.
Machine vision can be used for
- recognizing,
- identifying,
- detecting objects,
- recognizing text,
- reconstructing 3D shapes based on 2D images,
- recognizing and analyzing movement,
- reconstructing images,
- segmenting images,
- and many other things.
Let's explore what tools and libraries you can use to implement machine vision in your Android app.
Best machine learning tools for image recognition
OpenCV: the most famous machine learning library

OpenCV is the most popular machine vision library among developers that allows to integrate machine learning with Android. It's an open source library that stores thousands of algorithms for processing and analyzing images, including for recognizing objects in photos. For example, you can use OpenCV to recognize people's faces and postures or to recognize text.
This library was developed by Intel, and Willow Garage and Itseez now support it. It's written on C++, but it's also developed for other programming languages including Python, Java, Ruby, and Matlab.
OpenCV contains over 2,500 optimized algorithms for machine learning and computer vision. You can use OpenCV algorithms for
- analyzing and processing images,
- face recognition,
- object identification,
- gesture recognition in videos,
- camera movement recognition,
- building 3D models of objects,
- searching for similar images in a database,
- tracking eye movement,
- image segmentation,
- video tracking, and
- recognizing stage elements and adding markers for augmented reality.
But this library does even more. If you need an advanced tool for implementing machine vision in your mobile application, OpenCV is a great choice.
TensorFlow: a deep learning framework

TensorFlow is a machine learning framework from Google that you can use to project, create, and implement deep learning models. Deep learning is a part of machine learning that was inspired by how the human brain works.
You can use TensorFlow to create and teach neural networks of any known type.
Mobile development services
Do you want to integrate a machine learning algorithm into your mobile solution?
The TensorFlow library already works on lots of platforms, from huge servers to tiny Internet of Things devices. Mobile devices aren't an exception. For mobile applications, Google has released a separate library called TensorFlow Lite.
It was presented at I/O 2017 and
- is lightweight and fast on mobile devices;
- is cross-platform, so it works on lots of mobile platforms including Android and iOS;
- supports hardware acceleration that increasing its performance.
and
ML Kit: the newest framework for machine learning

Google presented Firebase ML Kit at I/O 2018, and it's one of the easiest to use frameworks for machine learning. Its API allows developers to use
- text recognition,
- face recognition,
- barcode recognition,
- landmark recognition,
- image labeling, and
- object recognition.
Whether you're a beginner developer or an experienced developer, you can easily use ML Kit in your mobile applications.
Let me show you an example of how I used ML Kit for image labeling.
Tutorial on image labeling
1. The first step is to connect to Firebase services. To do this, you need to enter the Firebase console and create a new project.
2. Then you need to add the following dependencies to your gradle file:
implementation 'com.google.firebase:firebase-ml-vision:18.0.1' implementation 'com.google.firebase:firebase-ml-vision-image-label-model:17.0.2'
3. If you use the on-device API, configure your app to automatically download the ML model to the device after your app is installed from the Play Store.
To do so, add the following declaration to your app's AndroidManifest.xml file:
<meta-data android:name="com.google.firebase.ml.vision.DEPENDENCIES" android:value="label" />
4. Now it's time to create the screen layout.
<?xml version="1.0" encoding="utf-8"?> <android.support.constraint.ConstraintLayout xmlns:android="http://schemas.android.com/apk/res/android" xmlns:app="http://schemas.android.com/apk/res-auto" xmlns:tools="http://schemas.android.com/tools" android:layout_width="match_parent" android:layout_height="match_parent" tools:context=".MainActivity"> <LinearLayout android:id="@+id/layout_preview" android:layout_width="0dp" android:layout_height="0dp" android:orientation="horizontal" app:layout_constraintBottom_toBottomOf="parent" app:layout_constraintEnd_toEndOf="parent" app:layout_constraintStart_toStartOf="parent" app:layout_constraintTop_toTopOf="parent" /> <Button android:id="@+id/btn_take_picture" android:layout_width="wrap_content" android:layout_height="wrap_content" android:layout_marginStart="8dp" android:layout_marginBottom="16dp" android:text="Take Photo" android:textSize="15sp" app:layout_constraintBottom_toBottomOf="parent" app:layout_constraintStart_toStartOf="parent" /> <TextView android:id="@+id/txt_result" android:layout_width="0dp" android:layout_height="wrap_content" android:layout_marginStart="16dp" android:layout_marginEnd="16dp" android:textAlignment="center" android:textColor="@android:color/white" app:layout_constraintBottom_toBottomOf="parent" app:layout_constraintEnd_toEndOf="parent" app:layout_constraintStart_toEndOf="@+id/btn_take_picture" /> </android.support.constraint.ConstraintLayout>
5. Use SurfaceView to show the camera preview. You should also add the camera permission in Manifest.xml:
android:name="android.permission.CAMERA
6. Create a class that extends SurvaceView and implements the SurfaceHolder.Callback interface:
import java.io.IOException; import android.content.Context; import android.hardware.Camera; import android.util.Log; import android.view.SurfaceHolder; import android.view.SurfaceView; public class CameraPreview extends SurfaceView implements SurfaceHolder.Callback { private SurfaceHolder mHolder; private Camera mCamera; public CameraPreview(Context context, Camera camera) { super(context); mCamera = camera; mHolder = getHolder(); mHolder.addCallback(this); // deprecated setting, but required on Android versions prior to 3.0 mHolder.setType(SurfaceHolder.SURFACE_TYPE_PUSH_BUFFERS); } public void surfaceCreated(SurfaceHolder holder) { try { // create the surface and start camera preview if (mCamera == null) { mCamera.setPreviewDisplay(holder); mCamera.startPreview(); } } catch (IOException e) { Log.d(VIEW_LOG_TAG, "Error setting camera preview: " + e.getMessage()); } } public void refreshCamera(Camera camera) { if (mHolder.getSurface() == null) { // preview surface does not exist return; } // stop preview before making changes try { mCamera.stopPreview(); } catch (Exception e) { // ignore: tried to stop a non-existent preview } // set preview size and make any resize, rotate or // reformatting changes here // start preview with new settings setCamera(camera); try { mCamera.setPreviewDisplay(mHolder); mCamera.startPreview(); } catch (Exception e) { Log.d(VIEW_LOG_TAG, "Error starting camera preview: " + e.getMessage()); } } public void surfaceChanged(SurfaceHolder holder, int format, int w, int h) { // If your preview can change or rotate, take care of those events here. // Make sure to stop the preview before resizing or reformatting it. refreshCamera(mCamera); } public void setCamera(Camera camera) { //method to set a camera instance mCamera = camera; } @Override public void surfaceDestroyed(SurfaceHolder holder) { } } Mobile development services
Do you want to integrate a machine learning algorithm into your mobile solution?
7. The last thing you need to do is add logic for the app's main screen:
- Ask the user for camera permission.
- If permission is granted, show the camera preview.
- After the user presses the Take Photo button, send the bitmap to FirebaseVisionImage and show the result after processing is complete.
import android.Manifest; import android.graphics.Bitmap; import android.graphics.BitmapFactory; import android.hardware.Camera; import android.support.annotation.NonNull; import android.support.v7.app.AppCompatActivity; import android.os.Bundle; import android.view.WindowManager; import android.widget.LinearLayout; import android.widget.TextView; import android.widget.Toast; import com.google.android.gms.tasks.OnFailureListener; import com.google.android.gms.tasks.OnSuccessListener; import com.google.firebase.ml.vision.FirebaseVision; import com.google.firebase.ml.vision.common.FirebaseVisionImage; import com.google.firebase.ml.vision.label.FirebaseVisionLabel; import com.google.firebase.ml.vision.label.FirebaseVisionLabelDetector; import com.google.firebase.ml.vision.label.FirebaseVisionLabelDetectorOptions; import com.gun0912.tedpermission.PermissionListener; import com.gun0912.tedpermission.TedPermission; import java.util.ArrayList; import java.util.List; import butterknife.BindView; import butterknife.ButterKnife; import butterknife.OnClick; public class MainActivity extends AppCompatActivity { private Camera mCamera; private CameraPreview mPreview; private Camera.PictureCallback mPicture; @BindView(R.id.layout_preview) LinearLayout cameraPreview; @BindView(R.id.txt_result) TextView txtResult; @Override protected void onCreate(Bundle savedInstanceState) { super.onCreate(savedInstanceState); setContentView(R.layout.activity_main); ButterKnife.bind(this); //keep screen always on getWindow().addFlags(WindowManager.LayoutParams.FLAG_KEEP_SCREEN_ON); checkPermission(); } //camera permission is a dangerous permission, so the user should grant this permission directly in real time. Here we show a permission pop-up and listen for the user's response. private void checkPermission() { //Set up the permission listener PermissionListener permissionlistener = new PermissionListener() { @Override public void onPermissionGranted() { setupPreview(); } @Override public void onPermissionDenied(ArrayList deniedPermissions) { Toast.makeText(MainActivity.this, "Permission Deniedn" + deniedPermissions.toString(), Toast.LENGTH_SHORT).show(); } }; //Check camera permission TedPermission.with(this) .setPermissionListener(permissionlistener) .setDeniedMessage("If you reject permission,you can not use this servicennPlease turn on permissions at [Setting] > [Permission]") .setPermissions(Manifest.permission.CAMERA) .check(); } //Here we set up the camera preview private void setupPreview() { mCamera = Camera.open(); mPreview = new CameraPreview(getBaseContext(), mCamera); try { //Set camera autofocus Camera.Parameters params = mCamera.getParameters(); params.setFocusMode(Camera.Parameters.FOCUS_MODE_CONTINUOUS_PICTURE); mCamera.setParameters(params); }catch (Exception e){ } cameraPreview.addView(mPreview); mCamera.setDisplayOrientation(90); mCamera.startPreview(); mPicture = getPictureCallback(); mPreview.refreshCamera(mCamera); } // take photo when the users tap the button @OnClick(R.id.btn_take_picture) public void takePhoto() { mCamera.takePicture(null, null, mPicture); } @Override protected void onPause() { super.onPause(); //when on Pause, release camera in order to be used from other applications releaseCamera(); } private void releaseCamera() { if (mCamera != null) { mCamera.stopPreview(); mCamera.setPreviewCallback(null); mCamera.release(); mCamera = null; } } //Here we get the photo from the camera and pass it to ml kit processor private Camera.PictureCallback getPictureCallback() { return new Camera.PictureCallback() { @Override public void onPictureTaken(byte[] data, Camera camera) { mlinit(BitmapFactory.decodeByteArray(data, 0, data.length)); mPreview.refreshCamera(mCamera); } }; } //the main method that processes the image from the camera and gives labeling result private void mlinit(Bitmap bitmap) { //By default, the on-device image labeler returns at most 10 labels for an image. //But it is too much for us and we wants to get less FirebaseVisionLabelDetectorOptions options = new FirebaseVisionLabelDetectorOptions.Builder() .setConfidenceThreshold(0.5f) .build(); //To label objects in an image, create a FirebaseVisionImage object from a bitmap FirebaseVisionImage image = FirebaseVisionImage.fromBitmap(bitmap); //Get an instance of FirebaseVisionCloudLabelDetector FirebaseVisionLabelDetector detector = FirebaseVision.getInstance() .getVisionLabelDetector(options); detector.detectInImage(image) .addOnSuccessListener( new OnSuccessListener>() { @Override public void onSuccess(List labels) { StringBuilder builder = new StringBuilder(); // Get information about labeled objects for (FirebaseVisionLabel label : labels) { builder.append(label.getLabel()) .append(" ") .append(label.getConfidence()).append("n"); } txtResult.setText(builder.toString()); } }) .addOnFailureListener( new OnFailureListener() { @Override public void onFailure(@NonNull Exception e) { txtResult.setText(e.getMessage()); } }); } } Here's what the result looks like:
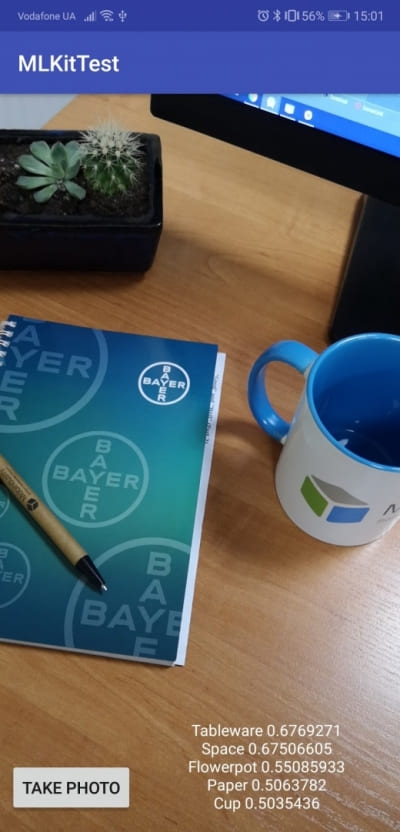
Now you know how to create an image recognition app! I used the offline version of ML Kit. The cloud version is available only with a paid subscription, but it gives more abilities to machine learning apps.
Key takeaways
It was rather easy to implement Android image recognition and integrate ML Kit in an Android mobile application. When I tested it, I discovered that it's not very precise, but it still works fine for an offline service.
One funny thing I noticed while working with ML Kit is that each time it didn't recognize an object in a photo, the classifier labeled it as a musical instrument.
The ML Kit developers made sure it's convenient to integrate their machine learning solution into a mobile application. To make it more advanced and customized, you'll need to use TensorFlow. In this case, ML Kit will become an API layer for your machine learning system, taking care of hosting and bringing a TensorFlow model to your mobile app.
Want to find out how to create advanced apps that use machine learning or machine vision model and integrate it into your mobile app? Contact Mobindustry. We'll help you create an intelligent mobile business solution or integrate Android app machine learning into your existing project.
Mobile development services
Do you want to integrate a machine learning algorithm into your mobile solution?
Incorporating Machine Learning Into App Design
Source: https://www.mobindustry.net/blog/how-to-integrate-machine-learning-into-an-android-app-best-image-recognition-tools/
Posted by: bellparist98.blogspot.com

0 Response to "Incorporating Machine Learning Into App Design"
Post a Comment